
Wednesday, November 23, 2011


VFSU COMPLETE RENDER PROCESS TUTORIAL (Beginner)
Here is the tutorial for V-ray rendering Beginner
Enlarge this image Click to see fullsize

1.- INTRODUCTION (CORRECTED)
hotfile.com 1.-_INTRODUCTION.wmv.html
2.- ILLUMINATION PART 1
hotfile.com 2.-_ILLUMINATION_PART_1.wmv.html
3.- ILLUMINATION PART 2
hotfile.com 3.-_ILLUMINATION_PART_2.wmv.html
4.- ILLUMINATION PART 3
hotfile.com 4.-_ILLUMINATION_PART_3.wmv.html
5.- MATERIALS PART 1
hotfile.com 5.-_MATERIALS_PART_1.wmv.html
6.- MATERIALS PART 2
hotfile.com 6.-_MATERIALS_PART_2.wmv.html
7.- MATERIALS PART 3
hotfile.com 7.-_MATERIALS_PART_3.wmv.html
8.- MATERIALS PART 4
hotfile.com 8.-_MATERIALS_PART_4.wmv.html
9.- POST PRODUCTION PART 1
hotfile.com 9.-_POST_PRODUCTION_PART_1.wmv.html
10.- POST PRODUCTION PART 2
hotfile.com 10.-_POST_PRODUCTION_PART_2.wmv.html
How to manage Shadow | Sun and Sky...
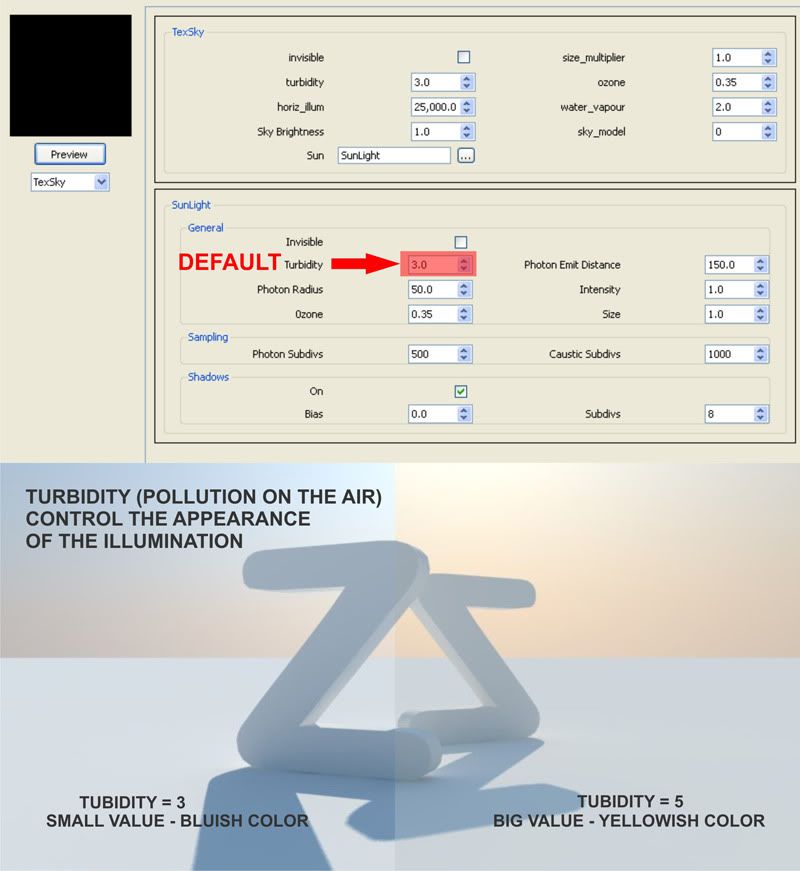
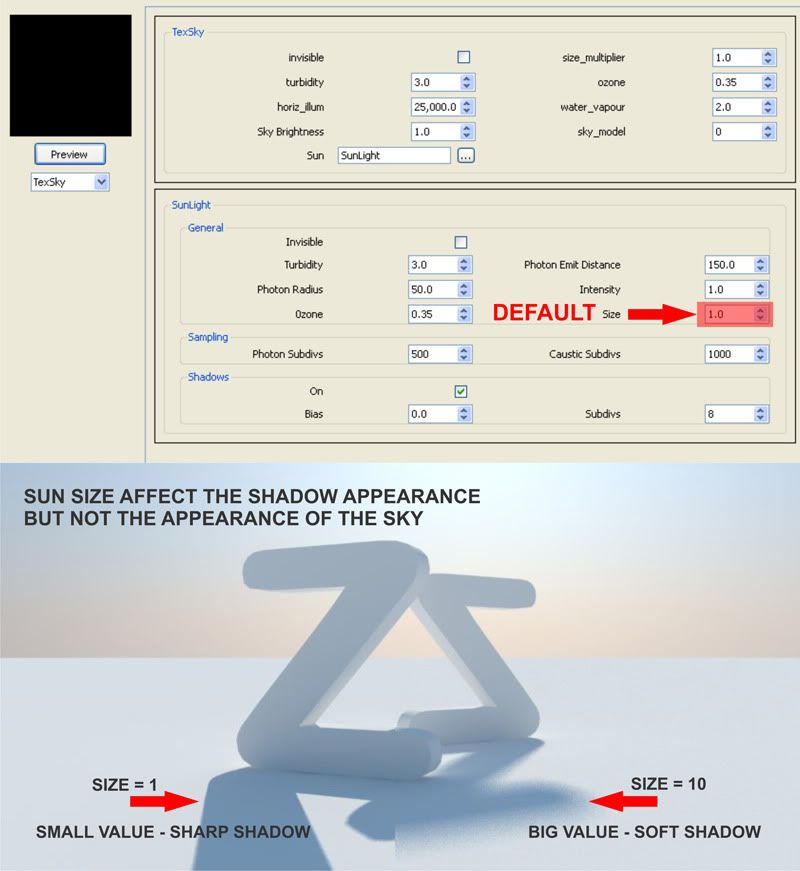
i made a simple test rendered scene and tutorial on how to manage the scene environment and illumination by adjusting the value of Turbidity | Ozone | Intensity | and Sun Size which you always use in your scene especially exterior.
CHECK ALSO - HERE
TURBIDITY
OZONE

INTENSITY

SUN SIZE
Tips and Tricks : if you use physical camera, you are going to reduce all the exposure of the other lights that you have in your scene and it's good idea to reduce the intensity of the sun if you already have all the other lights in the scene.
CHECK ALSO - HERE
TURBIDITY
OZONE
INTENSITY
SUN SIZE
Tips and Tricks : if you use physical camera, you are going to reduce all the exposure of the other lights that you have in your scene and it's good idea to reduce the intensity of the sun if you already have all the other lights in the scene.
Monday, November 21, 2011
Basic IES Light Tutorial using V-Ray for SketchUp
Basic IES Light Tutorial using V-Ray for SketchUp


By Nomer Adona
I am writing another IES lighting tutorial again showing the basic steps in using V-Ray for SketchUp 1.48.90 and future releases. Previously I had used 1.48.66 in my first IES tutorial, IES Light Tutorial using V-Ray for SketchUp but there seemed to be a few little bugs with that particular updated version. ASGVIS (now owned by Chaos Group) made a tremendous leap, and I can really conclude that their newest build is much more stable and easier to use. I planned to use the same file that I used with the first tutorial, but I have decided to just model a quick one for this new tutorial. I am using here also a photometric data name 6B3_(100A19).ies that I have downloaded for free fromLithonia, or SketchUpArtists Download Section and found under Tutorial Files.

In this tutorial, a special thanks to my friend Trang An. I am using some of his excellent components here for the purpose of seeing the overall effects of the IES lighting, instead of just using a simple room. In this tutorial, my materials have no reflections, bump etc (except for the receptacles) for quick rendering but later I will supply you hopefully with another tutorial on how to play with materials. Anyhow lets get started this tutorial.
1. SketchUp set up. Basic model and components.

Step 1
2. I have created a simple recessed light and made it into component. Then, I copied this component into 4 more instances. This is a good tip, so that when you place the V-Ray lighting; automatically you will have an instance of this lighting. This is the same when editing your V-Ray light, you will only edit one light inside this component, and the other lightings will be edited automatically. In the following image, I created V-Ray IES lighting, scaled it a bit and placed it below the receptacle.

Step 2
3. Then I clicked the IES light icon. Another menu box appeared (see below). Then under sampling (File) I clicked the box and browsed the IES photometric data (6B3_(100A19).ies. By default the power is set to 0. Even with this, V-Ray SketchUp will read the photometric data.

Step 3
In my opinion, using V-Ray sun and V-Ray physical camera is not necessary when rendering an enclosed space. This is advisable especially for beginners. The reason is, you don’t have to spend a huge amount of time in balancing the sun and the physical camera. V-Ray physical camera works together with the V-Ray sun, which is really a very strong light. The V-Ray physical camera acts like a counter balance in correcting the exposure of the image, much like an actual photo camera – where ISO, aperture size and shutter speed enable to control the exposure. Again in this tutorial, the V-Ray physical camera and the V-Ray sun were both turned off.
Here is the render.

Step 4 - Render
The above render is already showing the effect of the photometric lighting. On the other hand, I would want to see two things – the light source showing some lights and secondly I would like to increase the power of the IES lighting.
5. To achieve the first one, I am putting another rectangular light inside the receptacle to simulate the light source. The intensity of this rectangular light is small. I enabled the light, turned off the shadow, made it invisible and double sided. Below is the screen grab of my rectangular light settings.

Step 5
Here is the render. Now the light source is showing on the receptacles.

Step 5 - Render 1
To solve the second problem, I simply increased the multiplier of the IES light. Here I used power = 7000. Below is the render.

Step 5 - Render 2
6. If you want to change the color of the IES light, you can do it by putting color to the filter
color. Below I used warm yellow.

Step 6 Final Render
Now it’s up to you how you will do the next step. I hope this small tutorial did manage to clear up some of the confusion in the first IES tutorial.
Sunday, November 20, 2011
GLASS REFLECTION EFFECT TUTORIAL
 GLASS REFLECTION EFFECT TUTORIAL
Enlarge this imageReduce this image Click to see fullsize

Enlarge this imageReduce this image Click to see fullsize

Enlarge this imageReduce this image Click to see fullsize

Enlarge this imageReduce this image Click to see fullsize

Enlarge this imageReduce this image Click to see fullsize

Enlarge this imageReduce this image Click to see fullsize

Enlarge this imageReduce this image Click to see fullsize

Enlarge this imageReduce this image Click to see fullsize

Enlarge this imageReduce this image Click to see fullsize

Enlarge this imageReduce this image Click to see fullsize
Enlarge this imageReduce this image Click to see fullsize
Enlarge this imageReduce this image Click to see fullsize
Enlarge this imageReduce this image Click to see fullsize
Enlarge this imageReduce this image Click to see fullsize
Enlarge this imageReduce this image Click to see fullsize
Enlarge this imageReduce this image Click to see fullsize
Enlarge this imageReduce this image Click to see fullsize
Sunday, November 13, 2011
How to Make Full Android Backup via Titanium Backup, and How to Restore.
Backup and restore in android phones is now necessity of users. In this modern age there were many devices out there especially Android OS phones used like a PC.
According to using there were lots of activities are done on a single
phone. And suddenly all created data crashed cause of mistaken or need
of custom settings of older phone in new phone is being a headache for
users.
As in android phones there were a inbuilt feature is also come with the phone for creating backup.
But they were not much fine and ease like. So there is great news for
android users related to this subject. There is third party backup
application for android users named Titanium Backup
Key feature of “Titanium Backup”
- Backup of every app with its associated data.
- Backup of every app with its system settings.
- Contacts and card backup.
- Schedule Backup.
- Titanium backup. Grab it here.
- Android phone with rooting ability, Grab rooting guide for your phone here
- After rooting install Superuser app. Grab it here. (After rooting will see this app in applications folder)
Instructions to Install Titanium Backup app in your rooted android device.
1) Installing Titanium backup
First enable unknown source in application settings
(settings>applications). After that root your phone and now you can
install titanium backup on your device via android market
How to Make Full Android Backup via Titanium Backup, and How to Restore
August 21, 2011 By
As in android phones there were a inbuilt feature is also come with the phone for creating backup. But they were not much fine and ease like. So there is great news for android users related to this subject. There is third party backup application for android users named Titanium Backup
Key feature of “Titanium Backup”
- Backup of every app with its associated data.
- Backup of every app with its system settings.
- Contacts and card backup.
- Schedule Backup.
- Titanium backup. Grab it here.
- Android phone with rooting ability, Grab rooting guide for your phone here
- After rooting install Superuser app. Grab it here. (After rooting will see this app in applications folder)
Instructions to Install Titanium Backup app in your rooted android device.
1) Installing Titanium backup
First enable unknown source in application settings (settings>applications). After that root your phone and now you can install titanium backup on your device via android market

2) Creating first Titanium backup
- Open Titanium backup app.
- Tap on the Backup/Restore tab in home screen of “Titanium Backup-All”.

- In this portion press menu button of phone. Now a slide pop -up menu is appear, select batch from this.

- The batch menu is appearing. Now choose “[RUN] Backup all users apps+ system data”.

- Above menu is appear where we have two option one is
“Exclude active apps” where we can uncheck to particular apps which apps
data is not needed for creating backup. And other is “Kill active apps”
which select all of them.

- Now choose kill active apps. And tap on the button “Run the batch operation”.
- Now the Backup process is started and takes some time to complete.

- When process is completed the Backup and Restore menu is
again appear. Here some smiley faces, caution triangle and check marks
are right after the apps appears. For more tap menu and click on legend from the pop-up window.

- Except smiley faces and check marks there were caution triangles are the sign of missing backups so run the batch again until all becomes in smiley and checked.
- Now it’s completed. We are suggested you to safe a copy of this backup in your PC by copying TitaniumBackup Folder from SD card to PC.


3) Scheduling Titanium backups
It’s happen by choosing the “Schedules” tab in Titanium home screen.
4) Restoring Titanium backups
- Go to the batch menu in which we go earlier. Now select your suitable option from the “Restore” Header.

- Like if we want to restore angry bird unlocked levels that have miss then for an individual app hit on the top option.


That’s all is about the use of Titanium Backup app in your android phone
Enjoy! Your android phone upgraded with Titanium Backup
feature with the happy feelings of restoring every loss thing in your
phone anytime, anywhere with the Titanium backup App. If you face any
problem you can read Titanium Backup wiki here
Note
- Rooted android phone is especially needed for this purpose because this app needed administrator permission for deep backup of system files and rooting process will help him to allow this.
- Superuser is a helpful app. If the phone is already rooted then this app helps you to manage what app is allowed to access protected areas of your system.
- The Titanium Backup in require section is a free version you can also purchase it. More about it.
Pay attention
- If user should use schedule Titanium backup feature then allow titanium to go on this easily by checking the Remember box so it don’t ask for permission every time for this.
- Enable the setting “installation of app files from unknown source” (settings>applications). It is required in restoring from previous backup.
- After installation pay attention on every step and check out each step in this process carefully.
Preparing your Android Phone Before Upgrading Firmware
Upgrading your phones firmware and getting bunch of new features is really exited thing but new firmware comes with many problem.
You will lost your almost important data, settings and applications.
so before upgrading we have to create complete backup of our data and
some other task like -preparing PC. below you can see complete guide of
preparing phone before upgrading.
Please follow all steps of this guide , because it is essential for every android phone before upgrading / installing firmware.
(1) Check your phone compatibility
The first and most important thing is to check your phone’s current
firmware version and status of sim to ensure that you can update your phone or not . you can check firmware version by going to settings > about phone .
Other factor is if your phone is locked with network like T-Mobile , AT&T
or any of your area. Then it is Probably possible that you can’t
update your phone with the firmware of unlocked and international
version phone. check your phone network lock status by following this
very basic guide –
- Did your phone have any company logo on it ?
- Do you purchased your phone from a mobile operator store ?
- Do you got your phone under contract with any sim provider ?
- Does your phone blocks when you insert another operators sim ?
- Do you see mobile operators logo when you switch on/off your phone ?
If any one or more question’s answer is "YES" then it is confirmed
your phone is locked with network and you need to skip normal update
process . Wait for particular network firmware update
(2) Backup things

Note: While upgrading phone manually
or installing any leaked/beta/unofficial firmware , please make backup
with the methods below. pc suite software for your phone will not
recognize your phone after upgrade and you will not able to restore your
backup created by your phone’s pc suite (e.g. for Samsung KIES)
I). Backing up phone data
Updating firmware process will delete all data from your phone like
– message,contacts,calendar . So we have to make backup on sd card or
on pc or on online backup service. You can follow this Guide to Know
about backing up your phone data before upgrading.
Subscribe to:
Posts (Atom)